Transformer Oil Sampling, The First Step....Simple but Critical
-
12 April 2023
-
Jonathan Lewin
As engineers, we understand the importance of having reliable components as part of a larger system. To ensure the longevity and effective performance of our machines, it is essential that we stay well informed about their condition. Oil analysis provides us with invaluable insight into the condition of electrical systems by allowing us to monitor certain chemicals for signs of wear and degradation due to aging or other external influences. In this blog post, we will take a look at how oil analysis can provide insight into our mechanical systems as well as tips on incorporating these insights into your maintenance plans.
There are many steps in this process where quality is key and a lot of the time the focus is put on the lab chosen to carry out the analysis on your oils, and quite right too. Having a high-quality lab is vital but often the initial step is overlooked, which is arguably the most critical…Sampling!
Now if we get this first step wrong then everything after it follows suit, it doesn’t matter how good your lab is, imagine a domino effect. The good news is this first step is simple if done correctly. It’s about having the correct knowledge and the right tools for the job.
The standard document for sampling is IEC 60475: Method of Sampling Insulating Oils and this is the place to start. It is recommended that all sampling is in accordance with IEC 60475 which details the best practices and the different sample vessels to use dependent on the tests to be carried out.
Step 1
The first thing to consider is are you adequately trained to be taking the sample yourself or should you be getting an expert in to sample the units for you? Either way you are going to want to know that whoever is taking the sample knows what they are doing.
Step 2
When you look at the options available for sample vessels (and there are more than you think) we would recommend glass bottles with a polycone cap. The reason for this is that you can get enough sample in a 500ml bottle to carry out most, if not all your requirements and it is the only vessel (along with flexible metal) that is suitable for ALL standard tests…so you can have peace of mind on the sample vessel choice, quick and easy!

Figure 1. Clear and coloured 500ml sample bottles
Step 3
Now comes the tricky bit, getting the oil from the unit into the bottle and no, cracking the tap and ‘sticking’ a bottle under is not an appropriate method This will inevitably give you fluctuations and inaccurate oil quality results as you would be pulling in debris, air, moisture etc. from the surrounding environment, not to mention the particulate in the sample tap. Cleanliness is key here.
The easiest and best solution is to get yourself a sampling kit or ensure the engineers taking your samples are using one. Here is the type of sampling kit our engineers / clients utilise:
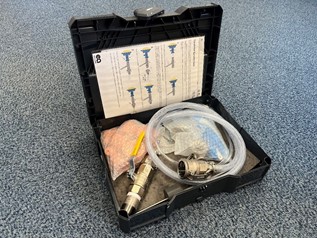
Figure 2. EA Technology oil sample kit
It’s important to keep any sampling kit clean after use so it is kept in a good condition and can then be re-used for future sampling requirements.
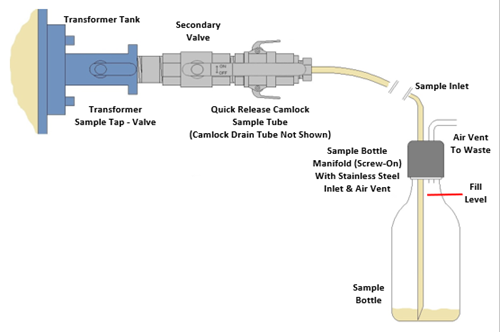
Figure 3. Pictorial guide to transformer oil sampling
There is a step by step process that should be followed and if done correctly will ensure a good quality and representative sample is taken:
- The above illustrated kit uses a secondary valve system (required to ensure integrity of the unit) which screws into the sample tap and couples this with a quick release camlock fitting system for sampling. All sampling should be carried out with appropriate PPE and sample drip trays etc.
- Clean the sampling point with a wire brush or lint free wipe, to remove any loose debris.
- Connect the secondary valve to the transformer sample tap with the secondary valve slightly open to prevent air lock between the two taps. Attach the quick release camlock with a drain tube.
- Turn on the transformer sample tap to allow the oil to drain into the secondary valve, open the secondary valve fully and flush to an oil waste container.
- Drain approximately 1 litre of oil (IEC recommends 5 litres for large transformers >75kV) and record the temperature of the flowing oil with a thermometer and write it on the sample label. The oil first drawn off should be inspected for presence of free water.
- Turn off the secondary valve and switch the camlock drain tube with the camlock sample tube and connect to the inlet on the sample bottle manifold.
- Allow a little oil to enter the bottle, turn off the secondary valve and remove the sample bottle manifold. Swill the bottle to clean / condition, dispose of the oil.
- Re-attach the sample bottle manifold and allow the bottle to fill slowly in a quiet manner to displace the air gently and cause minimum disturbance to the oil. Fill the bottle allowing some overflow then slowly withdraw the tubing with the oil still flowing.
- Close the secondary sample valve, then close the transformer sampling valve, disconnect the quick release camlock and allow the valve to drain.
- Tilt the sampling bottle to allow the oil level to slightly fall (leaving approximately 2cm of head space) and then screw the bottle cap securely in position.
Ready to send your sample off for testing? Make sure it's properly cleaned, labelled and securely packed before sending. This is key in ensuring safe transportation of the sample all the way to its destination lab - we'll discuss this vital step in-depth in our upcoming blog! Don't forget that having a quality representative sample sets you up well as soon as it arrives at the laboratory.
Jonathan Lewin
Oil Diagnostics – Head of Analytical
Direct Tel: 0151 339 4181
Jonathan.Lewin@eatechnology.com